Moving ordinary vehicles with bare hands is quite a tough job to do. This cannot be denied either, as towing vehicles is a common work, especially in public places. So there isn’t any way left out rather than getting its weight lighter to carry.
And this job gets easier when you have hitches. A good quality Weight distribution hitch makes this work more accessible and takes a shorter time. The following article is all about weight distribution hitch installation.
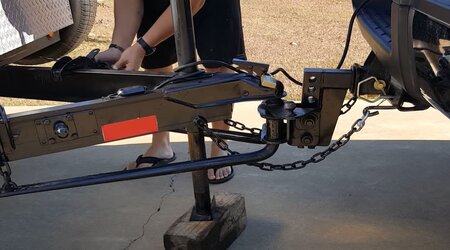
So what is a weight distribution hitch? It is a mechanical device that has to be attached to the chassis of a vehicle. Its’ purpose is just towing the vehicles. It doesn’t affect the tongue weight. Instead, it maximizes the hitch capacity of the vehicle by distributing the overall weight, which gets easier to carry.
Also read:
- How to Choose the correct WDH?
- 5 Best Eaz Lift Weight Distribution Hitch Reviews
- Andersen Weight Distribution Hitch Review (Performance Tested)
Why Do You Need a Weight Distribution Hitch
A weight distribution hitch is an essential tool for towing a vehicle seamlessly. It simplifies the process of moving trailers, redistributing the load from the trailer frame to the vehicle. This redistribution ensures that the weight is evenly distributed across the axles of both the vehicle and the trailer coupler.
It’s important to note that while a weight distribution hitch doesn’t alter the specific tongue weight of the trailer ball, it plays a crucial role in maximizing the capacities of both the vehicle and the hitch, provided they are rated for weight distribution. As a result, these hitches effectively make your vehicle lighter, enhancing its towing capabilities.
The use of weight distribution hitches significantly facilitates the towing of cars and relocating them to different places. The benefits they offer make towing jobs more manageable. These factors underscore the importance of incorporating weight distribution hitches for a smoother and more efficient towing experience.
Tools You Need to Setup a Weight Distribution Hitch

Before embarking on the setup of a weight distribution hitch, having the right tools is crucial. Attempting to set up a hitch without the necessary tools and adjustment steps can lead to significant challenges. Improper tool usage may prevent the hitch from effectively distributing the overall weight, potentially resulting in a complete failure. Given the effort invested in towing, experiencing a setback is undoubtedly undesirable.
To ensure a smooth and successful setup, it’s essential to use the appropriate tools. Without further delay, let’s delve into the essential tools required for this process.
- Shank Bolts: Essential for securing the shank of the weight distribution hitch, ensuring a stable connection between the hitch and the towing vehicle.
- Hitch Ball with Proper Weight and Size: A crucial component that matches the towing requirements, providing a secure point of attachment for the trailer.
- Measuring Tape: Used for accurate measurements during the setup process, ensuring precision in adjusting the weight distribution.
- Pencils: Handy for marking reference points and making adjustments, facilitating a systematic and organized setup.
- Thin Wall Socket: Necessary for tightening and securing bolts in confined spaces, offering versatility in the setup process.
- Socket Wrench: An essential tool for fastening nuts and bolts, providing the required torque for a secure hitch assembly.
The tools mentioned above play a vital role in ensuring the effective attachment and weight distribution of the weight distribution hitch. Proper utilization of these tools allows for the even distribution of weight across the axles, maximizing the hitch’s capacity. When the hitch head operates at its highest capacity and is securely fastened with the help of these tools, the connection between the trailer coupler remains robust. This ensures a smooth and efficient towing process, underscoring the importance of using the recommended tools for optimal usage of the weight distribution hitch.
Setting up Weight Distribution Hitch: Complete Guide
As we all know, a minimum initial setup is needed before using the weight distribution hitch. A book-like instruction manual is given with the whole device while buying the overall structure. This manual from Andersen hitch has a helpful guide focusing on installing a weight distributing hitch that is suggested to study once before practically installing.
Following the manual step by step might make your work even easier to do without any single issue. And once it’s fully prepared and attached, it’s ready for its towing mission.
Step 1: Measuring

Accurate measurements are crucial during the setup of a weight distribution hitch. Using a tape measure, measure the height of both the front and back of the trailer. Additionally, ensure you measure the height of the towing vehicle’s front wheel for precise adjustments. To complete the measurements, gauge the distance between the ground and the top of the coupler. These measurements are essential for achieving proper weight distribution and ensuring that the weight distribution hitch functions optimally.
Step 2: Hitch balls
To begin, ensure that the hitch balls are of the correct size and weight capacity for your towing needs. Attach them to the ball mount assembly using lock washers and nuts. A crucial tip is to consistently use lock washers and position them adjacent to the nuts. The lock washers should always be securely fastened next to the nuts to maintain a reliable and stable connection. This practice enhances the overall safety and effectiveness of the hitch ball assembly.
Step 3: Hitch bar
Select adjustable hitch bars, also referred to as shanks, based on the appropriate length. This ensures sufficient clearance for turning without causing damage to your trailer. Choosing the right length for the adjustable hitch bars is essential for maintaining safe and effective towing, allowing for smooth turns without compromising the integrity of the trailer and the proper tongue weight.
Step 4: Inserting the shank

Insert the bar into the towing vehicle, adjusting its height to match that of the trailer. Once the bar is correctly positioned, secure it with a pole pin. Subsequently, place the ball mount assembly onto the hitch, completing the installation process. This ensures a secure and stable connection, crucial for safe and effective towing.
Step 5: Hardware installation
Install the hardware into both the top and lower holes of the ball mount, ensuring not to fully tighten the nuts at this stage. Tighten them just enough to prevent rapid movement of the ball mount. This preliminary adjustment allows for further adjustments and ensures a secure yet flexible connection, laying the foundation for the subsequent steps in the installation process.
Step 6: Spring bars

Spring bars play a crucial role in a weight distributing hitch. Attach the chains to the bars using bolts, flat washers, and locknuts, ensuring there are two to three threads beneath the lock nut for proper fastening.
Determining the correct spring bar height is vital. Ensure the ball is vertical and slightly tilted towards the trailer for optimal performance.
Insert the bottom knob into the lower socket of the ball mount. Note that adjusting the bottom-mounted coupler may have slight variations, so consulting the manual before setup is recommended. This meticulous approach ensures a secure and effective configuration of the weight distribution hitch.
Step 7: Final installation

Tongue jacks play a pivotal role in elevating ball couplers. Adjust the couplers to the same height until the hitch ball is positioned directly beneath, initiating the necessary friction. Prior to this, accurate measurements of the towing vehicle are essential. Once at the correct height, lower the couplers, creating the crucial connection. To complete the setup, reinsert the spring bars, ensuring a secure and effective configuration of the weight distribution hitch.
Note: Always remember to connect your electrical and safety chains before towing
After diligently following the aforementioned steps, attach the brackets by tightening the jam bolts until they snugly reach the frame, ensuring not to over-tighten. Following this, raise the trailer tongue with the trailer jack to minimize the weight as much as possible.
Position the snap-up brackets parallel to the ground for easy chain attachment. Once the chain is attached to the closest hook, slide the snap-up brackets over the yoke. After raising, secure the yoke with safety pins, repeating the process on the other side. Lower the jacks, allowing the tongue to be unsupported, and ensure the jack is raised and out of the way.
Post-installation, re-measure the front wheel of the towing vehicle. The measurement should either be the same or slightly higher than before. This indicates the weight distribution hitch is ready for operation. The final step involves connecting the chains, marking the completion of the proper installation of the weight distribution hitch.
Weight Distribution Hitch Setup FAQs

Can you put too much tension on the weight distribution hitch?
The most effective method for selecting a weight distribution hitch is to determine it based on the loaded tongue weight of the entire setup when fully loaded. Once this initial step is completed, the setup is ready for towing.
How tight should weight distribution bars be?
When installing a weight distribution system with spring bars hanging from chains, it’s crucial to tighten the spring bar chains appropriately. Over-tightening may pose a slight issue to the front and rear bumper, but adjusting the tension with precision can address this concern without sacrificing effectiveness. Engaging the spring bars correctly will naturally result in the desired level of tightness, ensuring optimal performance.
Should I remove weight distribution bars before backing up?
While it is possible to back up with a weight distribution hitch, it’s imperative to disconnect the friction sway control beforehand to prevent unintended damage. Prior to this, ensure that your hitch pin has a maximum trailer weight rating higher than the weight of your trailer, guaranteeing a secure towing setup.
Conclusion
Weight distribution hitches are consistently relied upon for towing vehicles, and their undeniable utility cannot be overlooked. The ease of use significantly simplifies the towing process, saving time and effort. Achieving a balance where the towing weight surpasses your vehicle’s spring arm weight by one-half is commendable.
The straightforward setup and initial installation method detailed above make the weight distribution hitch an accessible and practical solution for towing vehicles. Considering all these factors, the weight distribution hitch proves to be a valuable tool.
If you’re uncertain about which weight distribution hitch to purchase, I recommend checking out my other articles for more guidance:


